Search This Blog

Wednesday, July 31, 2013

Coffee Candles

Last night while my husband was doing a little work on the computer, I was perusing my phone.  Going to Pinterest, I was looking through some of my pins for dinner ideas.  As I was scrolling through, I chuckled to myself remembering when my sister Renae showed me Pinterest for the first time. I thought it was kind of cool and fun but I never thought I would really use it.  I would go through and pin a couple neat things--easy things-- yet I wouldn't make them.  Even a 3 ingredient recipe just 'sat on my wall'.   After a little nudging from my younger sister (yes, we older sisters have to admit sometimes that they are right :), I actually started USING it.  

An example of something that would have just sat there, just filling up one of my albums, is this adorable candle setup. The best part is I had everything here to make it.  Without Renae, my office would not be smelling like coffee right now!

After dumping out my tacks, rubber bands, and paperclips (which this did work great for), I washed up the white dishes.  Using the leftover coffee beans that I had, I filled them up. This is the second project I have done with these coffee beans.  To check out the first one, click HERE.  Making use of beans that just weren't my 'cup of tea'  (or should I say coffee ;) has proved to be productive.

Place a tea light in each container.  Light and ENJOY!

Excuse me while I go make myself some coffee! :)


THINGS YOU NEED:

Cute containers
Coffee beans
Tea lights
Lighter :) 


Tuesday, July 30, 2013

Creamy Veggie Cheese Bread

Our Mom has always been famous for the ability to throw some random ingredients together with no recipe and somehow it still tastes fabulous! Me??...not so much. So when I threw this together for a quick meal and it actually tasted pretty good...I even impressed myself! ;) It is now one that is often requested...especially by my oldest, Evan. His words, "Mom, can you please make this every day?" :) Although that is unlikely to ever happen, I do love this for a quick lunch! :)


Creamy Veggie Cheese Bread 

 Ingredient List: 
 1 loaf French bread 
1 medium green pepper 
1 medium or large onion 
8 oz fresh mushrooms 
6-8 oz cream cheese 
8 oz mozzarella cheese 
Olive oil, salt, and pepper


Step 1: Turn your oven to "broil". 

Step 2: Slice the french bread length-wise. Place face side down and place under broiler for 5 minutes or until lightly toasted. When toasted, flip over and toast other side. Remove from oven when all sides are lightly toasted.


Step 3: While the bread is toasting, thinly slice your green pepper, onions, and mushrooms. Saute them in a couple of tablespoons of olive oil on medium-high heat.


Step 4: Soften your cream cheese. I use 8 ounces. Six ounces would be sufficient but if you love cream cheese like me...use 8! :)


Step 5: Spread softened cream cheese evenly over the toasted bread .


Step 6: By now your veggies should be tender. Salt and pepper to taste.


Step 7: Arrange the sauted veggies on the bread.


Step 8: Top with mozzarella cheese.


Step 9: Return to the oven under the broiler. Remove when cheese is melted and starts to turn golden brown.


Step 10: Slice into wedges and enjoy! Tastes great served with a simple lettuce salad. 


*Note: This is also excellent as a pizza! Just omit the French bread (obviously :) and top a pre-baked pizza crust {for a quick, homemade crust, click here!} with the veggies and cheeses. Yumm-o!


Crock Pot Shredded Chicken

I was looking for something easy to make for dinner tonight. Tony and I were both going to be working all day, and I knew it would be nice to come home to a meal almost ready to go. We're both big fans of tacos, but rarely branch out to any other meat. Occasionally, we'll do chicken, fish, or even shrimp (we're adventurous like that!), but we mostly stick to ground beef.

I decided to pull the crock pot out and throw something simple together. Glad I did! It turned out to be such a great meal to come home to after a long day. And now we even have leftovers for tomorrow! Double bonus. :) 


This literally only takes about 3 minutes to put together in the morning, then you leave it all day, and come home later to shred it. We threw it into soft shells for tacos, but there are so many things you could do with it! 


Tacos
Quesadillas
Enchiladas
Pulled Chicken Sandwiches
or
Serve Over Rice w/Beans & Corn

That's just a few ideas. :)


Now you probably want to know what I did, huh? Let me put your mind at ease.

Just take some salsa....


....add taco seasoning.....


...throw in a little ranch dressing mix....


....and stir it up.


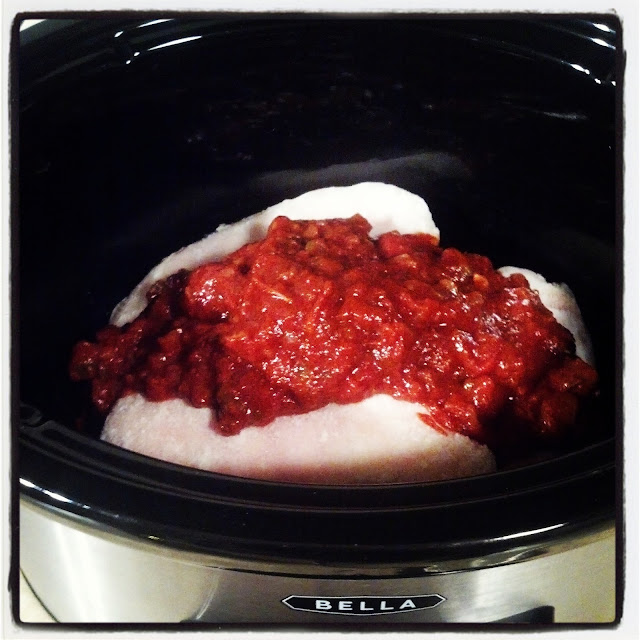
Now, put your chicken in the crock pot.


Pour your salsa mixture on top.
(You can spread it out a bit if you want, too.)


Set your timer.

Low= 6-8 hours         or         High= 4-6 hours


{I put mine on low for 6 1/2 hours. It automatically shut off when the time was up, but I didn't get home for another 3 hours after it was done. It stayed warm and was perfectly cooked and very moist!}


Pull the chicken breasts out and start shredding with forks.


**Want a quick tip?**
If you have a Kitchen Aid Stand Mixer, place your chicken in the bowl (while it's still warm/hot!) and mix it with the paddle. You will have restaurant-style shredded chicken in no time!


Ingredients

3 large chicken breasts, frozen
2 c. salsa
1 packet taco seasoning
1 Tbsp ranch powder (click here for a homemade version!)


Directions

Place chicken in your crock pot.
In a small bowl, combine salsa, taco and ranch seasonings.
Pour over chicken.
Cover and cook.
(6-8 hours on Low or 4-6 hours on High)
Shred. :)


Monday, July 29, 2013

Easy Cornbread Mix

A little effort can go a long way! Making your own cornbread mix is a great example! All you need is some basic ingredients and a large storage container. :)


First of all, you will need a large bowl for your ingredients. Combine the following : 

 8 cups flour 
 6 cups cornmeal 
 1 1/2 cups sugar 
 7 Tbls baking powder 
 2 Tbls salt

 Mix well.

Pour into your storage container. Label your container with your instructions so when you grab it out of the cupboard you won't even need to look up directions ...saving you even more time! I simply used a recipe card and some strapping tape. (Classy, right?;)


 Instructions to include: 
 Combine 2 cups mix with: 
2 eggs 
1 cup milk 
1/4 cup melted butter 
 Bake at 400 degrees.
 8×8 pan for 20-25 minutes
 Muffins for 15-20 minutes
\

This is all you will need to add to your dry mix!! This recipe will make approximately eight 8×8 pans!! Now, next time you need a quick batch of cornbread, it will take nearly zero effort! But sshhh....no one needs to know that! :) Remember, cornbread does not need to be boring! Our favorite way to eat it is with some butter and real maple syrup for breakfast. Another fabulous way to enjoy it is to top with raspberries or strawberries and whipped cream...or add green chiles and cheese to the mix before baking. Lots of possibilities! Let me know if you have some creative ideas!


"As Easy As Pie"...Pie Crust!

As mentioned before, I am a baker at a little diner.  Aside from cakes, I really enjoy baking pies.  I have a very easy, yummy pie crust recipe.  I find this very funny.  I often get asked, "where did you go to school to learn this?"  More often than not, I answer 'MOM'S ACADEMY'!  Our mother taught us many necessary skills which are amazing to have in a time where anything homemade is almost unheard of!  I truly appreciate what I was taught and if I am blessed to have children of my own some day, I hope I can pass down recipes and skills as my mother taught me!! 

Now that I am done being sentimental, I can continue.  Just to let you know, the more I post, you will realize I am kind of an emotional nut.  It will probably spill on the page! :)  I love my family and anything that makes me think of them, well...you get the point! :)

So...Ingredients:

3 Cups flour
1 tsp. baking powder
1 tsp. salt
1 1/3 cup butter

1 egg
 1 T. apple cider vinegar
5 T. cold water


In a large bowl, mix flour, baking powder, and salt. Stir until mixed evenly.


Cut butter in dry mix until you end with a rough texture. Set aside.


In a separate bowl, add egg, vinegar, and water.  Sorry for the confusion.  I have 2 eggs in this picture because I was doubling the batch. :)  With a fork, mix ingredients.


Bringing the bowl of dry ingredients over, pour the liquid mixture around the outside of the flour mixture.  


Using a fork, mix until all is moist.


Form little balls a little smaller than a baseball size.  You can play with the amount until you get used to what you need.  I like to add a little more flour to my dough ball at this time until I reach the consistency I like.  You will quickly learn when you don't have enough flour, because when you begin rolling it out, it will stick. Don't fret...if it's not right, gather it all up, add a little more flour and start again!


I start by rolling my dough out to about 5 inches.  At this point, I pick it up, throw some more flour underneath it and flip it over.  This step is probably just one of my little idiosyncrasies!  Hehe!!  Let me know if this is unnecessary!


Roll dough out!  Make sure to make it bigger than your pan.  I like to leave at least a good inch over the sides!


After carefully folding your dough into a quarter piece, gently place in your pan as shown above. Unfold to cover the whole bottom half.  Unfold again to cover the whole tin!  I understand this is pretty self explanatory but, you never know. :)


Using a pair of kitchen scissors, trim around pie tin, leaving about 1/4 to 1/2 inch (depending if you enjoy crust or not). 


 Neatly fold under.  This is another thing you don't have to do, I just like how much neater it looks.  If you don't want to take the time to fold under, ignore the directions above about leaving 1/4 inch...just trim with a knife along the pie tin.


Crimp your pie according to your preference!

Now you are ready to make a beautiful single crust pie!  Shall I post a pecan pie recipe soon! ;)


Sunday, July 28, 2013

Fresh Herbs...ANYTIME!

I am a baker!  I am not so great at the whole cooking part.  Yes, I can cook some basic things but using "quality ingredients", I'm learning.  My husband, on the other hand, is quite amazing in the kitchen.  He saw this awesome idea that for having fresh herbs year round to make his already yummy meals better! He told me about it, thinking it would be something cool to put on our blog and share with everyone! 
Because I don't have an herb garden, I made due with a "fresh" selection from our local grocery store. :) 


Things you will need:
Olive Oil
Ice Cube Trays
Fresh Herbs (I chose Thyme, Basil, and Rosemary)


Chop your herbs to desired size!


Put approximately 1 heaping tsp. of chopped herbs in each section of ice cube tray and fill with olive oil. 


Freeze until firm.

Once firm, run a butter knife along the long sides of the cubes on each side or they will crack!  Carefully pop out with knife.
Try and do this quickly because they make a mess if you are too slow! :)


Store in a Ziploc bag and throw in the freezer until you are ready to cook with a little olive oil and fresh herbs!!

Saturday, July 27, 2013

{To die for!} Blueberry Muffins

 If you've been following our blog at all, you have probably noticed that I'm not the healthiest eater. But, honestly...how can you resist when things like THIS are staring back at you!?


I know muffins can't talk, but I'm pretty sure I heard a voice loud and clear screaming "Eat me!" Maybe it was a sign from Above telling me that I deserve a treat. Or maybe I was hallucinating. 
Either way, I obeyed. :)


INGREDIENTS

Muffins:
1 1/2 c. flour
3/4 c. sugar
1/2 tsp. salt
2 tsp. baking powder
1/2 tsp. cinnamon
1/3 c. vegetable oil
1 egg
(about) 1/3 c. milk
1 1/2 c. blueberries (fresh or frozen)

Crumb Topping:
1/4 c. sugar
2 Tbsp. flour
1 tsp. cinnamon
2 Tbsp butter, room temperature


DIRECTIONS

 Add dry muffin ingredients to a medium sized mixing bowl. Stir well.
In a 1 cup measuring cup, fill with 1/3 c. oil. Add egg. Fill remaining space with milk.
Add to dry mixture and stir until moistened.
Fold in blueberries.
Fill lined muffin tin.
In a small bowl, cut butter into the crumb topping ingredients until mixture begins to look like crumbs.
Sprinkle onto the muffins.
Bake in a 400 degree oven for 5 minutes, then turn the oven to 350 degrees and bake an additional 15-20 minutes, or until toothpick inserted in center comes out clean.
Cool on a cooling rack.

*Makes 12 muffins.


(DIRECTIONS WITH PHOTOS)

In a medium sized mixing bowl, combine dry muffin ingredients.


Stir well.


In a 1 cup measuring cup, fill with 1/3 cup oil.


Add egg.


Fill remaining space with milk to equal 1 cup.


Add to the dry ingredients.


Stir until well moistened.


{If you are using fresh blueberries, be sure to wash them.
If using frozen, do not thaw them.}


Fold blueberries into the mixture.
(If using frozen berries, your mixture will look a little grayish/purple. That is okay.)


Grease or line your muffin tin. 
(This recipe makes 12 regular size muffins or 8 jumbo muffins.)


Using my large Pampered Chef scoop, I filled my liners.


The cups should be pretty full.


Now, in a small bowl, combine your crumb topping dry ingredients.


Add the butter.


Using a fork, cut the butter in until it resembles crumbs.


Sprinkle over the (unbaked) muffins.


Bake in a preheated 400 degree oven for 5 minutes.
After 5 minutes, turn heat down to 350 degrees and bake for an additional 15-20 minutes. Muffins are done when a toothpick inserted in the center comes out clean.


Cool on a cooling rack.


I made these for a friend of mine who just had a baby, and was still in the hospital when I went to see her. She loved them! :) 


This has been my favorite blueberry muffin recipe for about 3 years now. 
I don't see that changing any time soon! :)


*This recipe has been adapted to fit my tastes. You can find the original recipe at allrecipes.com


Check these out!